SignalFlag SDK
Introduction
SignalFlag's standard workflow runs your sim (i.e. build) inside our platform so we can manage execution, collect outputs, and generate metrics. However, if you can't or don't want to dockerize your sim, you can still generate metrics for analysis. SignalFlag's SDK allows you to run tests outside of SignalFlag, on your own infrastructure, export the results, and generate metrics for these tests.
There are a few different reasons you may want to run tests on your own infrastructure, outside of SignalFlag:
- You are just getting started, and want to explore our metrics framework
- You want to run tests on actual hardware, and only use SignalFlag as a visualization/analysis tool
- Your system is difficult to dockerize, perhaps due to special hardware requirements
This guide walks you through how to use SignalFlag's Python SDK. You can run your tests wherever you like, emit structured data from each test, then upload the results to SignalFlag. The tests will appear in the SignalFlag app exactly like any other batch.
Metrics required
This feature utilizes the metrics framework. It is recommended to familiarize yourself with Metrics. You need at least a valid metrics config file (by default .resim/metrics/config.resim.yml) with topics defined before running batches this way. A small, functional example is provided in the Github repo below to get you started.
Installation
Running batches outside of SignalFlag is supported via our Python SDK:
pip install signalflag
# or, if you're using uv
uv add signalflag
Note: The signalflag package requires Python >= 3.10.
Coming from resim-sdk?
signalflag is the same SDK under its new name, and installing it over an existing resim-sdk is all the upgrade there is. The resim.* import paths still resolve to the same modules, so code written against resim-sdk runs unchanged. pip install resim-sdk also keeps working — see the rename page for what else the name change does and does not touch.
Quickstart
The following repository contains a working example that creates a batch with a few tests and generates some metrics:
https://github.com/resim-ai/resim-sdk-example
The example in this repo will create a small batch, with a couple of tests, and generate some simple metrics.
API Documentation
Basic usage involves create a Batch, with Tests inside, and emit-ing relevant data under each test.
from signalflag.sdk.batch import Batch
from signalflag.sdk.test import Test

# `DeviceCodeClient` will trigger an interactive prompt to authenticate.
from signalflag.sdk.auth.device_code_client import DeviceCodeClient
client = DeviceCodeClient()

# OR, if you want non-interactive authentication, like for a CI system, use `UsernamePasswordClient`
# instead, and request credentials from SignalFlag. The username/password below are NOT your personal
# credentials.
# from signalflag.sdk.auth.username_password_client import UsernamePasswordClient
# client = UsernamePasswordClient(username="*****", password="*****")

# Create a batch, and run the "my metrics" metrics set from your metrics config file
with Batch(
    client=client,
    project_name="my-project",
    branch="metrics-test-branch",
    metrics_set_name="my metrics",
    # The SDK reads .resim/metrics/config.resim.yml by default. Pass metrics_config_path to use another file.
) as batch:
    print(f"Created batch {batch.friendly_name} with id {batch.id}")

    # Create a test, and emit some random data for the "position" topic
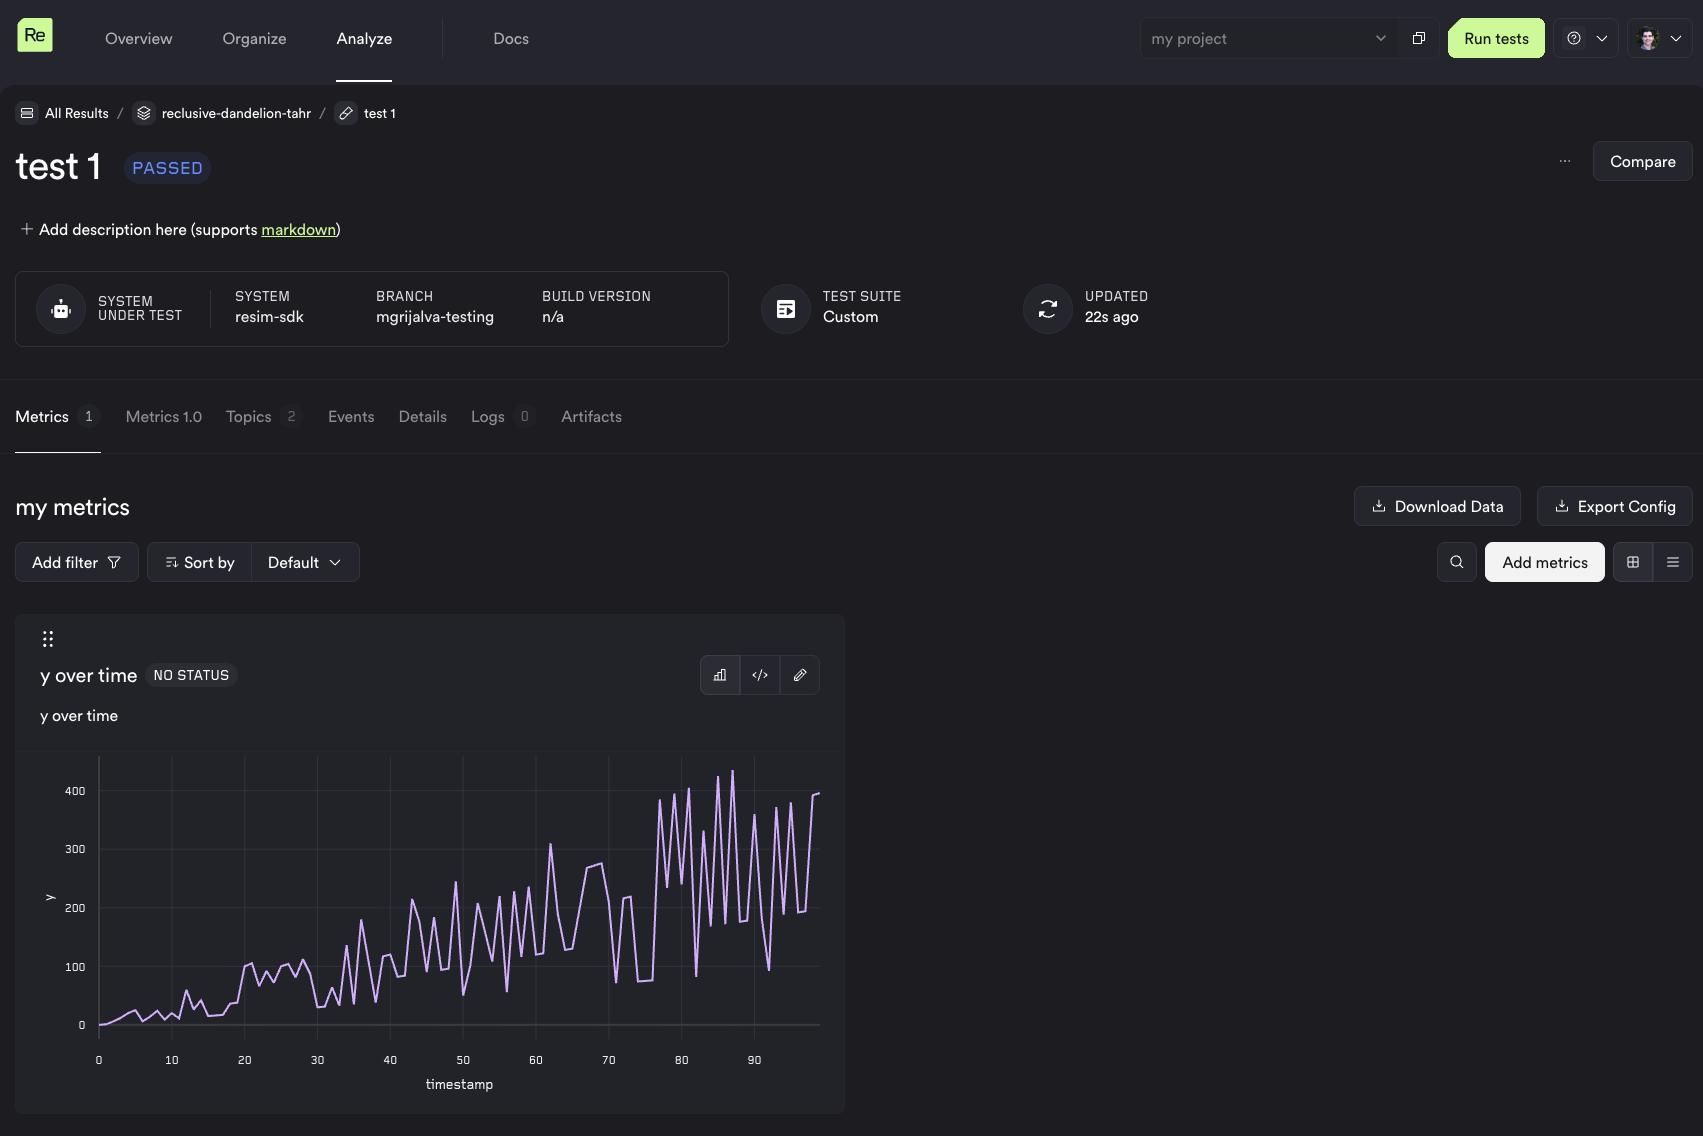
    with Test(client, batch, "test 1") as test:
        for i in range(10):
            test.emit("position", {"x": float(i), "y": float(i)}, i)

    # When finished the emitted data will be uploaded to SignalFlag so metrics processing can begin
Branches and versions
The Batch constructor accepts a branch (required) and an optional version string. Common values for version include a commit SHA, a semver tag, or a build number.
Using these fields can enable longitudinal analysis, such as:
- How has metric X changed in my branch versus main?
- How has metric Y changed between release versions 2.0 and 3.0?
branch is required because SignalFlag performs a backwards-compatibility check when syncing a new config, ensuring you don't make destructive changes to your topics - for example, changing an string field to a integer could potentially break queries against historical data. For this reason, we recommend experimenting on a branch other than main when getting started.
Batch parameters
| Parameter | Type | Description |
|---|---|---|
client |
AuthenticatedClient |
Required. Authenticated API client. |
project_name |
str |
Required. Name of the project to associate this batch with. Provide this or project_id, not both. |
project_id |
str |
Required. UUID of the project to associate this batch with. |
branch |
str |
Required. Branch name to associate this batch with. |
metrics_set_name |
str | None |
Name of the metrics set, from your metrics config.resim.yml file, to run against emissions. |
name |
str | None |
Human-readable name for the batch. If not provided, one will be generated. |
version |
str | None |
A version string (e.g. a git SHA, or semver number) to tag this batch with. Useful for tracking longitudinal metrics. |
metrics_config_path |
str | list[str] | None |
Path to your metrics config file, or a list of files to merge (each topic may appear in only one file). The config is synced to the batch's branch before the batch is created. Defaults to .resim/metrics/config.resim.yml. Pass None to skip the sync. |
templates_path |
str | None |
Directory of custom templates to sync with the config. Defaults to .resim/metrics/templates. |
system |
str | None |
Name of the system to attach this batch to. The system must already exist. See Systems and test suites. |
test_suite |
str | None |
Name of the test suite to attach this batch to. The suite must already exist. Required if test_suite_revision is provided. |
test_suite_revision |
int | None |
Use this specific revision of the test suite. If not given, it will use the latest revision. |
Test parameters
| Parameter | Type | Description |
|---|---|---|
client |
AuthenticatedClient |
Required. Authenticated API client. |
batch |
Batch |
Required. The parent Batch instance. |
name |
str |
Required. Name of the test. |
Note: Each test is tied 1-to-1 with an Experience. The name of a test comes from the experience. This means when you do Test(name="hello world"), the SDK will get-or-create an experience with that name. This is mainly an implementation detail, but useful to know if you want to associate any tests with pre-existing experiences.
Because of this, the test name is what links a test across batches. Two batches can be compared test by test only where the test names match, so keep test names stable from one run to the next, and put anything that changes between runs (a build, a checkpoint, a parameter) in the batch version or in the emitted data instead.
Each Test writes its emissions to emissions_<job_id>.resim.jsonl in the current working directory before uploading it. To keep these files out of your repository, run from a temporary directory and give Batch absolute paths for metrics_config_path and templates_path.
Emitting data
test.emit() writes a data point to the emissions log for that test. Topic names and schemas must match your metrics config file. You do not need to manage the emissions file yourself. The SDK handles creating and uploading it to SignalFlag automatically. The test object supports all emit methods. The metrics guide will cover these in greater depth.
test.emit(topic_name, data, timestamp)
test.emit_series("odom_linear_velocity", {
 "x": [1.0, 1.1, 1.1, 1.2],
 "y": [2.0, 1.9, 1.8, 1.7],
 "z": [3.0, 3.0, 3.0, 3.0]
}, timestamps=[0, 500000000, 1000000000, 1500000000])
test.emit_event("goal_reached", {"name": "Goal 1 Reached", ...}, timestamp=1750000000)
For more details on emitting data, see emitting your data
Attaching files
Use test.attach_log() to upload a file (such as an image, GIF, or other artifact) and associate it with a test result:
test.attach_log("run_001.mcap")
The file is uploaded to SignalFlag's storage and registered under the test. You can attach any file type — images, logs, MCAPs, videos, etc.
attach_log also accepts:
| Parameter | Type | Description |
|---|---|---|
log_type |
LogType | None |
The kind of log, from signalflag.sdk.test.LogType (for example LogType.OTHER_LOG). If not given, SignalFlag infers it from the file name. |
file_name |
str | None |
The name to store the file under. Defaults to the file's base name. |
wait |
bool |
Keyword only. Upload now and return when done, instead of in the background. Use it when you are about to delete or change the file. |
Uploads run in the background by default, so keep each file in place and unchanged until the test closes. Closing the test waits for every upload, and raises LogUploadError if any of them failed.
Image and Video metrics
For image and video metrics, attaching the file is required. Your metric references the image by filename, so the file must be uploaded for the image metric to render:
test.attach_log("screen_capture_123.png")
test.emit("my-image-topic", {"img": "screen_capture_123.png"}, time.time_ns())
The image's filename in the emission must match the filename passed to attach_log: use the file's base name, not its path. The metrics engine uses this reference to retrieve and render the image.
Here is how the metrics config would look for the above image metric:
topics:
  images:
    schema:
      img: image

metrics:
  images:
    type: test
    query_string: select img from images
    template_type: system
    template: image
Authentication
DeviceCodeClient signs you in through your browser. The first time it needs a token, it prints Please navigate to: <url> and then waits until you approve the sign-in in your browser. Run it where you can see that output: in a background job or an upload script, the link reaches no one and the process seems to hang.
The token is cached in ~/.signalflag/token.json (or in ~/.resim/token.json, if only that directory exists from an earlier install). Later runs reuse it. A token within one hour of its expiry counts as expired, and the next client starts a new sign-in. Do not share or print the cache file; it is a credential.
Syncing a config without a batch
Batch syncs your metrics config when it starts. To sync a config without creating a batch, for example to check that a new config is accepted, use metrics.sync_config:
from signalflag.sdk.auth.device_code_client import DeviceCodeClient
from signalflag.sdk.bff_client import metrics

metrics.sync_config(
    DeviceCodeClient(),
    "<project_id>",
    "my-scratch-branch",
    config_path=".resim/metrics/config.resim.yml",
    templates_path=".resim/metrics/templates",
)
Each branch keeps its own config, and the sync checks a new config against the branch's current one. Changing a column's type is refused, and removing a topic hides its history on that branch (see Removing topics). Try new configs on a scratch branch first.
Systems and test suites
Batch can attach a batch to a system and a test suite, by name. Both must exist before the batch is created.
A test suite is built from experiences that already exist, and the SDK creates an experience the first time it sees a test name. So the order is:
- Create the system.
- Push a first batch without
test_suite. This creates an experience for each test. - Register those experiences on the system and create the test suite from them, with the metrics set it should run. See Create Test Suites.
- Pass
test_suite=on later batches, andtest_suite_revision=to use a specific revision.
When the list of tests changes, revise the suite to make a new revision.
Viewing results
Once the Batch context exits, and all metrics processing is complete, navigate to your project in the SignalFlag app to view the batch, its tests, and generated metrics — the same as any batch run inside SignalFlag.